(To view Part 1, click here and Part 2 click here.)
This is it, folks ... we are almost done and now you just need to bone up on bragging.

We last left our binding here, having carefully cut off the excess around the edge. The rest is all hand sewing.
(Some students were actually shocked to find this out, but face the facts ... if you want that traditional looking binding ... you sew it down [on the back] by hand.)
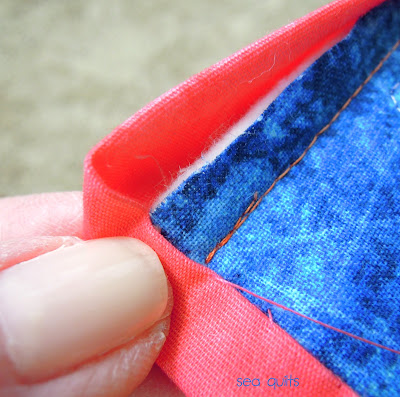
Flip the binding to the backside and secure it. I use binding clips to hold it down as I work since I am adverse to leaving my DNA on my quilt. If you choose to use pins, that is pretty much going to happen. I personally just use 2 clips and then move them in leap-frog fashion as I go. If you would like, clip the whole dang thing before you begin. The binding should cover the evidence of that 1/4" seam that you took when you sewed it down. Ideally, it should pull around snugly to just go past that seam.

The thread you choose should match the BINDING not the backing. I am very partial to using Aurifil thread for this task (see why ... here) but at any rate you want a thinner thread. Use a single strand and put a knot in the end. Thread it through in the 1/4" edge. Each time you end and then start a new thread, do it here.

Bring the needle up on the very edge of that folded part of the binding and then go back down into the backing at that very same spot.

When you go through the backing to come up again as shown, you are putting the needle through the backing and batting but NOT through to the other side. This is a rather important "point".
(And yes ... I can see I am in need of some lotion. Sorry.)

This picture is a good example of the stitch. Go down directly to the side of where you came up and then bring it up on the edge.
This ... by the way ... is the same as the hand-applique stitch. Two, two, tutorials in one!

While keeping the binding lying perpendicular to the opposite side, bring your needle up at the corner where the binding meets that other seam.

Now, fold the other side down so that the corner ... meets the corner.
Not too far, not too close.
Goldilocks just right.

Bring your needle up to catch that corner. (The angle of this picture is a little deceiving. I am bringing the needle up right from underneath the corner and then up through it.)

See how the angle of the fold disects the corner like a mitered corner.
At this point I take a second stitch in that same spot to secure it ... then ...


WOW! You're my new favorite blog! I live in Florida most of the year and LOVE everything beachy! I'm putting your blog in my favs list! Thanks!
ReplyDeleteBeautiful quilt and GREAT tutorial for teaching the hand sewn binding. Beautiful. Beautiful. I'll be featuring this tonight. xo Jami
ReplyDeleteThank you for thiss
ReplyDelete