Tuesday, May 29, 2012

~ A Wallpaper Weekend ~


My Memorial Day Weekend involved two plane flights and a lot of food that was NOT good for me.
It also involved a DIY project at my daughter's new home.
And as a result ... it involved Amy Butler.


All of the walls in this room were painted a peachy beige, so the first thing we did was paint the other three walls white.  You know I love white.


Then we applied this to-die-for paper by Amy, called Lacework - Moss.


Oddly enough, it was the kind of paper where you actually put paste on the wall first making it significantly more difficult.

But still worth it.


Please understand that my role in this whole thing was to hand Ms. G things as she needed them.  I did play a slightly more significant role in the painting process.

Apparently, I am really good at handing people things.


This room (once the bed frame has an actual ... bed ... attached to it) will be the guest room ... which I like to call "my room".

I daresay that there will be many more of those same flights (or drives) in the future.

Do you blame me? 
Posted by Picasa

Thursday, May 24, 2012

~ Swedish Dots ~


After a jaunt to IKEA this last weekend, I realized that perhaps I am a tad too predictable.


Naturally I picked up these dotty ... blue dotty ... pillow covers.  They were $7 a piece ... with zippers.  I couldn't sew them for that.


I do love the irregularity of these particular dots, don't you?


Next ... on to blue dotted storage boxes.
Is there any other kind?


The only problem is that I only bought two and now I need two more.
Please IKEA don't run out of them before I can get back.
Please.


After I unpacked my loot, I discovered two things:
a) I left a darling turquoise scrub brush in the cart (oh, how I hate it when that happens) and ...
b) I still adore my blue dotted (those dots are actually light teal) glasses that I purchased on my last trip to IKEA.

Be honest ... am I in a rut ... a blue dotted rut??

PS! My binding tutorials were featured at Freckled Laundry!
Thank you Jami at Freckled Laundry.
Woohoo.


Posted by Picasa

Monday, May 21, 2012

~ With Stars upon Thars ~


As if my studio wasn't colorful enough ... what with all that fabric and all ...


I now have this wall of color to greet me each and every time I enter.


I have one of my daughters ... and whoever invented Mother's Day* ... to thank.


Sometimes it's hard to get past the door and get to work.


I am facinated by the way the light bounces off these babies.


I love their irredescent nature.


Don't you?


I love their shiny little arms.


Let's face it ... I love color!!

I hope your Mother's Day was as colorful as mine.

* Thank you, Anna Jarvis!
Posted by Picasa

Thursday, May 17, 2012

~ Quilt Binding Tutorial: Part Three ~


(To view Part 1, click here and Part 2 click here.)

This is it, folks ... we are almost done and now you just need to bone up on bragging.


We last left our binding here, having carefully cut off the excess around the edge.  The rest is all hand sewing.
(Some students were actually shocked to find this out, but face the facts ... if you want that traditional looking binding ... you sew it down [on the back] by hand.)
Flip the binding to the backside and secure it. I use binding clips to hold it down as I work since I am adverse to leaving my DNA on my quilt.  If you choose to use pins, that is pretty much going to happen. I personally just use 2 clips and then move them in leap-frog fashion as I go.  If you would like, clip the whole dang thing before you begin.  The binding should cover the evidence of that 1/4" seam that you took when you sewed it down.  Ideally, it should pull around snugly to just go past that seam.


The thread you choose should match the BINDING not the backing. I am very partial to using Aurifil thread for this task (see why ... here) but at any rate you want a thinner thread. Use a single strand and put a knot in the end. Thread it through in the 1/4" edge.  Each time you end and then start a new thread, do it here.


Bring the needle up on the very edge of that folded part of the binding and then go back down into the backing at that very same spot.


When you go through the backing to come up again as shown, you are putting the needle through the backing and batting but NOT through to the other side.  This is a rather important "point".
(And yes ... I can see I am in need of some lotion.  Sorry.)


This picture is a good example of the stitch.  Go down directly to the side of where you came up and then bring it up on the edge.
This ... by the way ... is the same as the hand-applique stitch.  Two, two, tutorials in one!


And now ... down again.  Keep this up every 1/4" or so until you come to the first corner.


Here we are approaching the corner.


While keeping the binding lying perpendicular to the opposite side, bring your needle up at the corner where the binding meets that other seam.


(More evidence of my need for hand cream.)


Now, fold the other side down so that the corner ... meets the corner.
Not too far, not too close.
Goldilocks just right.


Bring your needle up to catch that corner.  (The angle of this picture is a little deceiving.  I am bringing the needle up right from underneath the corner and then up through it.)


See how the angle of the fold disects the corner like a mitered corner.
At this point I take a second stitch in that same spot to secure it ... then ...


I bring the needle up about 1/4" up that mitered fold ... on the very edge once again ...


... and I come down and then out on that corner exactly.


Then I start the whole process once again, to be repeated at all four corners.


Voila!!
Beautiful, crisp, continuous binding.
No bumps on the binding edge, no 'dog-ears' at the corners.
Just right.

Try it.  You'll like it.
Posted by Picasa

Sunday, May 13, 2012

~ Quilt Binding Tutorial: Part Two ~


If you missed out on Part One ... Click here. Then be sure to come back!

Wow!! I had some wonderful response from my last post (thanks to all those who "pinned" me) and I'm all excited about this next part ... which is the part that a LOT of quilters have not yet caught on to. This is the part where you connect the last two ends into one continuous ... seamed ... piece.  No bumps, no folding under, no "jerry-rigging".  Just one last seam that is exactly like all the other seams in the binding.
True story.


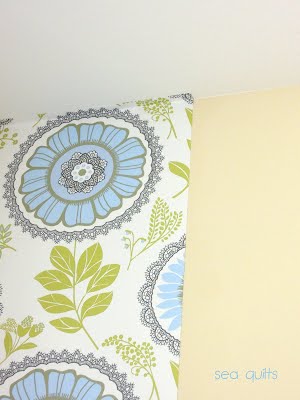
The first and most important thing you will do at this point is to position the quilt exactly as you see it in the picture above. The edge that you will be working with is facing AWAY from you, and everything you do in preparation before you actually sew the seam, must be don't from this angle.
Do NOT ask me why.
Just Do It. 


The next thing you will do is cut a small piece from the right had flap. (The only exception to this is if you have barely enough extra to join the edges, in which case you can just keep in mind the width that you cut your binding pieces, e.g. 2 1/4".)
If you did cut that piece off the right, then keep it right there as a measuring device.


Take the flap on the left and fold it back over itself.  That fold should not quite touch the other flap.  The idea is that if you pushed that left fold (assuming you were the sewing machine foot) then it would barely touch the other side. What that amounts to is about 1/8" (tops) in between. 


Now take that little scrap of binding that you cut off and place the right edge on the edge of that folded piece. Draw a line along that left edge and then cut THE TOP FLAP OF THE FOLD on that line.  Please don't cut both flaps or you will have a small, ugly fit.


You can see here how the folded back flap is the same measurement as the width of the binding piece.


Now (being careful not to twist anything) you will take the left flap and open it up with the right side facing UP and place the right flap (right side facing DOWN) so that the edges meet as shown.  Because both flaps are seriously attached to the rest of the quilt ... they will want to resist this union. You will need to pin them as securely as possible.


The seam that you will be sewing will go from the left side (where the blue pin-head is) to the right side (where the yellow pin-head is.)  As easy as it would be to sew it in the other direction, that is just not going to work, trust me.


Draw a line (on the wrong side of that top flap) from where the left corner of the top flap is to the right corner of the bottom flap.  This is exactly what you did when you joined the rest of the pieces before we started this whole process, although this time the edges must meet up exactly.


Now you must take this piece and put it under your foot to sew the seam.  More than likely you will need to pull out some stitches on one or both sides to make it possible to maneuver under your foot. This step is easier with a bigger quilt, that is why you are working from the longer side, if possible.
Hint: This little seam does NOT require a Walking Foot, so if you are more comfortable with a regular foot, go ahead and use it.  Just make sure to change back to the Walking Foot to sew the final stretch. 


After sewing this final juncture, but before you trim the seam to 1/4", pull it out lengthwise to make sure nothing has twisted.  Your odds are good if you did indeed position the flaps away from you as in the first step.  For whatever reason, this helps prevent twisting. 


At this point, go ahead and trim the corner off that seam, leaving 1/4".  As best as you can, press the seam open and then re-press the crease in the binding.


Align the raw edge to the raw edge, just as you have all along. Give it another good steam pressing and then go ahead and use a couple of pins.  Your binding will lay flat without any excess if you have followed the directions.


Now ... with your Walking Foot on ... start sewing about a short distance before the stitching ended and continue that same 1/4" seam down until you meet the stitchin on the other end and keep sewing for a short distance to secure the stitches.
Voila! Continuous, non bumpy, fabulous binding.
True story.
 
 Now you are at the point where you will cut off the excess edge of backing and batting.  Do this very carefully with the quilt layed out in front of you so you only cut what you are supposed to! Keep the corners a crisp 90 degrees and be careful not to cut into the flap of the folded over tent. Do not cut into your 1/4" seam.

Excellent Job!!
Stay tuned for Part Three where I will demonstrate the handsewing on the back, particularly on those lovely square corners.

Thanks for your support.  Oooh ... and thank you, Pinterest!
Posted by Picasa